Wallpaper April 2012 – HDR covered bridge
Posted by Darlene on Friday, March 30, 2012 · Leave a Comment

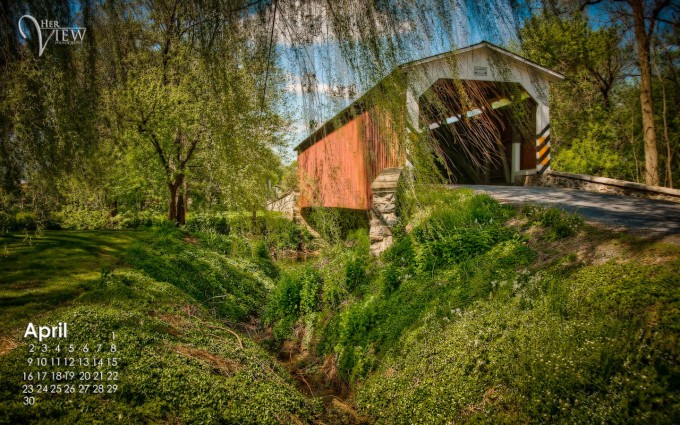
Wallpaper for April 2012 – covered bridge Lancaster County, PA
The April 2012 desktop wallpaper is now available for download in the top six most popular screen resolution sizes and proportions. Please select the one closest to your screen size and proportions for the best fit. On a PC, right click one of the links below and then “save target as..”, on Mac, Ctrl-Click. If it’s not quite the right shape or size you may have to choose “stretch to fit”. If it doesn’t look quite right you may have to chose another size that’s closer, check the proportions of your screen.
Download April 2012 wallpaper below:
1024×768 | 1280×800 | 1280×1024 | 1366×768 | 1440×900 | 2560×1440
The lovely covered bridge in this month’s wallpaper image was taken somewhere in Lancaster County, Pennsylvania. It’s deep in the heart of Amish country and every few miles we found another one of these as we drove around. If I remember correctly my husband even had a map showing where all the bridges are so you can do a bridge tour. I think we hit about 5 or 6 by the end of the day, and say a lot of Amish farms and the countryside. We really love this area of the country and found it stunningly beautiful with rolling hills and lots of green, as you can see.
If you want to purchase a print of this image, or any of the past 2012 desktop wallpaper images just click on the image above or go to the gallery here.
How this month’s wallpaper image was made
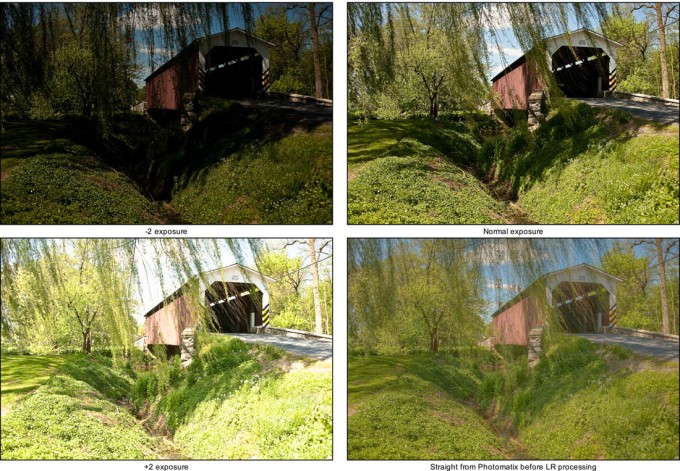
This month’s wallpaper also comes with a before and after showing how I used HDR to create this image and hold detail in all areas of the photograph. Photographing in bright sunlight like this, and including a structure that you can see into, like the covered bridge, creates a range of brightness that can’t be captured with one exposure. It’s simple too great of a range for any camera to capture details in both the highlights (brightest areas) and shadows (darkest areas) and for any printer to print. Ideally I’d have loved to return to this spot a few hours later and photograph it again as dusk but I didn’t have that option so I went to Plan B which was to do an HDR tone mapped image combining 3 exposures into one.
I set my camera on auto bracket to take 3 exposures: -2, 0 and +2 so I have one that’s too dark, one that’s in the middle, and one that’s too bright. Then using
Photomatix I tone mapped them together, and did final adjustments in Lightroom to adjust the contrast (add black back in), saturation, and add edge darkening vignettes. The sample below shows the 3 bracketed shots, then the image straight out of
Photomatix. The finished image after tweaking in Lightroom is at the top of the article.
If HDR is something you think you’d like to try, go to the
HDR Soft website (they make Photomatix) and download the trial version. If you want some guidance, and live in the Edmonton area come take my
HDR Class!


